

As an Amazon Associate and eBay Partner, toptenpick.com earns from qualifying purchases. Prices and availability are subject to change.
Here is what makes the electric fan swap on a Fox Body Mustang different from bolting on a set of headers: the fan is the cheap half of the job, and the charging system is the part that decides whether it works.
A stock 1979-1993 Mustang left the factory with a 1G alternator putting out somewhere around 65 to 75 amps, on a car with no serious electrical loads beyond headlights and a radio. A good dual electric fan draws meaningful current continuously and a great deal more in the moment it starts — and it runs hardest exactly when the car is sitting in traffic with the alternator spinning at idle speed, producing the least it ever will. Add an aftermarket stereo, a fuel pump and air conditioning to that and the stock system simply cannot keep up. The battery makes up the difference until it cannot, and then you have a car that dims at idle, boils in traffic, and eventually will not start.
So the honest shopping list for this modification is a fan and a 3G alternator conversion — the common upgrade puts out around 130 amps, roughly 80 of those at idle, which is the number that matters. It also needs the right supporting wiring: a heavy power feed (4 gauge is the usual recommendation) direct to the battery, a properly rated relay so the fan is not switched through a thin signal wire, and a fuse sized to the fan. That relay-and-fuse detail is where most home installations fail — a fan wired directly to a switch on the dash is drawing its whole current through the dashboard.
One more thing before the list. CFM ratings are quoted in free air, not through a radiator core. A fan advertised at 3,000 CFM will move considerably less than that once it has to pull air through a dense core, a condenser and a grille. Compare fans by amp draw and by whether they come with a shroud, because a shroud that seals to the radiator does more for real airflow than a few hundred claimed CFM ever will.
| # | Product | Price | Where to buy |
|---|---|---|---|
| 1 | Dual Electric Fan with Integrated Shroud | $130-$300 | Amazon |
| 2 | Single High-Output Fan with Shroud | $100-$220 | Amazon |
| 3 | 130 Amp 3G Alternator Conversion Kit | $200-$400 | Amazon |
| 4 | 4 Gauge Alternator Power Wire Kit | $40-$90 | Amazon |
| 5 | Fan Relay and Fuse Kit | $25-$70 | Amazon · eBay |
| 6 | Adjustable Thermostatic Fan Controller | $70-$200 | Amazon · eBay |
| 7 | Aluminium Radiator, Two- or Three-Row | $150-$400 | Amazon · eBay |
| 8 | Digital Multimeter with an Inductive Clamp | $40-$150 | Amazon · eBay |
| 9 | Engine Bay Wiring Loom and Heat Sleeve | $20-$60 | Amazon · eBay |
| 10 | Upgraded Battery Cables and Engine Ground Straps | $40-$120 | Amazon |
The picks, in detail
Dual Electric Fan with Integrated Shroud
The standard answer and the right default. Two fans in a moulded shroud that seals against the radiator means the fans pull air through the whole core rather than just the two circles in front of them — which is the single biggest determinant of real-world cooling. For a Fox Body, look for a unit sized to the specific radiator you have rather than a universal one you will end up trimming. Expect a substantial continuous draw and a much larger inrush, which is exactly why the alternator section below matters.
- Two fans in a full-width moulded shroud
- Shroud seals to the radiator face
- Sized for common Fox Body radiator dimensions
- Mounting hardware included
- Shroud makes the whole core work, not just the fan circles
- Redundancy — one fan failing is not a roadside stop
- Substantially better at idle than a clutch fan
- Significant continuous and inrush current draw
- Universal kits often need trimming to clear the water pump
Single High-Output Fan with Shroud
One large fan in a shroud, and for a mildly modified street car it is often the smarter buy. A single large blade moves air more efficiently than two small ones for the same current, and there is one motor to fail rather than two. The trade-off is that there is no redundancy and that a big single fan has a heavier inrush. Suits a car that is not making big power and spends its time on the street rather than sitting in a staging lane.
- Single large-diameter fan in a shroud
- Generally lower continuous draw than a dual setup
- Reversible for pusher or puller mounting on some models
- Curved or S-blade designs for higher static pressure
- More efficient per amp than two small fans
- One motor and one connection to maintain
- Usually cheaper than a dual kit
- No redundancy if the motor fails
- Heavier inrush current at start-up
130 Amp 3G Alternator Conversion Kit
The part of this job that people leave out and then regret. The factory 1G alternator produces around 65 to 75 amps, which was adequate for a car with no electric fan. A 3G conversion produces roughly 130 amps and — the number that actually matters — about 80 amps at idle, which is where the fan works hardest and the old alternator produced least. Buy it as a kit with the conversion harness rather than assembling one. Note that the 3G case is larger and usually needs the factory bracket clearanced with a grinder.
- 130 A output, around 80 A at idle
- Conversion harness for 1G-to-3G wiring
- Fits 1979-1993 Fox Body with bracket work
- Usually supplied with a heavy charge wire
- Triples charging capacity across the rev range
- Idle output is what an electric fan actually needs
- Kits include the harness so nothing is improvised
- Larger case requires clearancing the factory bracket
- Adds meaningfully to the cost of the fan swap
4 Gauge Alternator Power Wire Kit
Non-negotiable with a 3G conversion. The factory charge wire was sized for a 65 amp alternator, and running 130 amps through it produces heat, voltage drop and a genuine fire risk. A dedicated 4 gauge power wire kit with a proper fusible link or mega fuse at the battery end carries the current and protects the cable. Most 3G kits include one; if yours does not, buy it before you fit the alternator, not after you notice the old wire getting warm.
- 4 gauge cable, typically around 110 inches
- Crimped and heat-shrunk ring terminals
- Mega fuse or fusible link for the battery end
- Loom or conduit for the run
- Carries 130 A without heating or dropping voltage
- The battery-end fuse is the primary fire protection
- Pre-terminated kits avoid a bad home crimp
- Routing a heavy cable neatly takes time
- Proper crimping needs a hydraulic tool

Fan Relay and Fuse Kit
The detail that separates a working installation from a smoking one. A fan must never draw its current through a dashboard switch or a thin signal wire — the switch controls a relay, and the relay passes the current on heavy cable direct from the battery, through a fuse sized to the fan. A kit with a sealed 40 or 70 amp relay, the correct fuse holder and pre-made leads costs very little and removes the single most common home-wiring failure in this modification.
- Sealed automotive relay rated for the fan draw
- Weatherproof fuse holder and fuse
- Heavy-gauge leads, pre-terminated
- Dual-relay kits for two-fan setups
- Keeps fan current out of the dashboard entirely
- Sealed relays survive an engine bay
- Cheap and quick to fit
- One more component that can fail
- Cheap relays weld their contacts closed
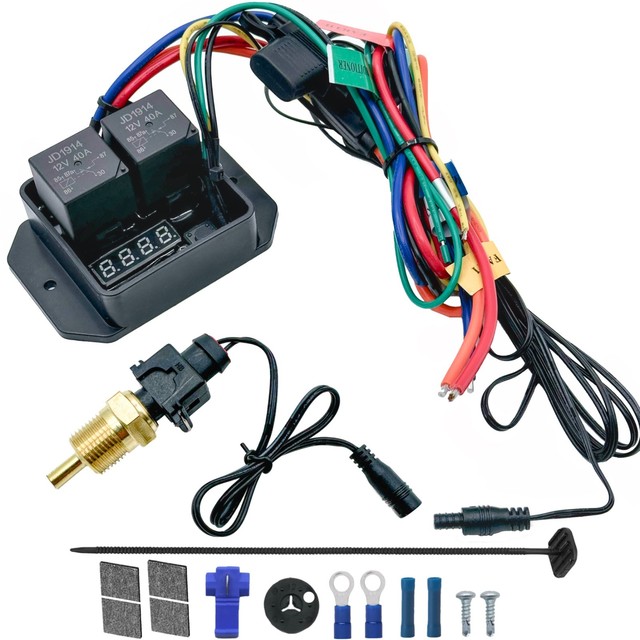
Adjustable Thermostatic Fan Controller
Better than a dash switch and better than an on/off thermal switch. An adjustable controller reads coolant temperature from a probe and switches the fan at a threshold you set, rather than one the manufacturer chose. Better versions ramp the fan with pulse-width modulation, which reduces both the inrush spike and the noise, and include an air conditioning trigger so the fan runs whenever the compressor does. For a car with an upgraded alternator this is where you get the electrical load under control.
- Adjustable switch-on and switch-off temperature
- PWM speed control on better units
- Air conditioning trigger input
- Probe fits in a radiator fin or a coolant port
- You choose the temperature, not the manufacturer
- PWM ramping cuts the inrush spike and the noise
- Runs the fan automatically with the air conditioning
- Fin-probe sensors read less accurately than in-port ones
- More wiring than a simple thermal switch

Aluminium Radiator, Two- or Three-Row
Worth considering at the same time, because a fan can only pull air through the core you give it. A Fox Body with the original radiator and 200,000 miles of scale in it is not a cooling problem an electric fan will fix. An aluminium replacement with wider tubes gives more surface area and dissipates heat faster, and most are sold with mounting points that suit common fan shrouds. Do this and the fan swap together rather than discovering afterwards that the radiator was the limit.
- Two- or three-row aluminium core
- Direct-fit Fox Body mounting
- Wider tube designs for more surface area
- Many sold with fan mounting provisions
- Removes the other half of most cooling problems
- Lighter than the original brass and copper unit
- Fan shrouds usually mount without fabrication
- Adds substantially to the total cost
- Cheap units have poorly finished tanks that seep

Digital Multimeter with an Inductive Clamp
The tool that answers every question in this job with a number instead of an opinion. A clamp meter measures the fan’s actual draw without breaking into the circuit, tells you whether the alternator is really producing what it claims at idle, and shows the voltage at the battery with everything running. Every argument in Fox Body forums about whether a stock alternator is ‘enough’ is settled in about two minutes with this. It also finds the parasitic drain that kills batteries on cars of this age.
- Inductive DC current clamp
- Voltage, resistance and continuity
- Min/max recording to catch an inrush spike
- Automotive versions include a duty-cycle function
- Measures real fan draw without cutting anything
- Confirms alternator output at idle, where it matters
- Finds parasitic drains on an old car
- Cheap clamps are inaccurate at low DC currents
- Peak inrush is fast — you need min/max to catch it

Engine Bay Wiring Loom and Heat Sleeve
The finishing work that decides whether this installation is still reliable in five years. A Fox Body engine bay is hot and the cars are all over thirty years old now, so added wiring needs proper protection: split loom for abrasion, high-temperature sleeve near the headers, and zip ties or clips every few inches so nothing sags into a pulley. A chafed fan feed shorting to the block is a fire, not an inconvenience. This costs very little and takes an hour.
- Split convoluted loom in several diameters
- High-temperature fibreglass sleeve for hot areas
- Adhesive-lined heat shrink for joints
- Cable clips and stainless zip ties
- Protects the heavy feeds that carry real current
- Makes a home installation look and behave like a factory one
- Cheap insurance against a wiring fire
- Tedious to do properly
- Bulky loom can be hard to route in tight spaces
Upgraded Battery Cables and Engine Ground Straps
The most commonly missed fault on a car this age, and the one that makes a new alternator look faulty. Charging current has to return through the grounds, and thirty-year-old ground straps corrode at exactly the point you cannot see. Symptoms are perfect: dim lights, a fan that sounds weak, a voltmeter that reads low, and an alternator that tests fine on the bench. A set of heavy battery cables and fresh engine-to-chassis and engine-to-body straps is cheap and should be done before blaming anything else.
- Heavy-gauge positive and negative battery cables
- Engine-to-chassis and engine-to-body straps
- Tinned copper lugs resistant to corrosion
- Pre-made kits for Fox Body applications
- Fixes symptoms routinely blamed on the alternator
- Cheap and quick
- Improves starting as well as charging
- Corroded ground points need cleaning to bare metal first
- Easy to overlook the body ground behind the engine
Buying tips
- Budget for the alternator, not just the fan. The factory 1G puts out around 65 to 75 amps and produces its least at idle — exactly when the fan works hardest. A 3G conversion gives roughly 130 amps and about 80 at idle. Fitting a good fan to a stock charging system produces dim lights, a flat battery and a car that still overheats in traffic.
- Never switch fan current through a dash switch. The switch triggers a relay; the relay passes the current on heavy cable direct from the battery, through a fuse sized to the fan. Wiring a fan straight to a switch runs its full draw through the dashboard, and that is the most common way this modification ends in smoke.
- Ignore CFM figures and compare amp draw and shroud quality. CFM is quoted in free air, not through a radiator, a condenser and a grille. A shroud that seals to the radiator face makes the whole core work instead of just the circles in front of the blades, and that matters far more in practice than a few hundred claimed CFM.
- Check the grounds before you blame the alternator. Charging current returns through the ground straps, and thirty-year-old straps corrode where you cannot see them. Dim lights, a weak-sounding fan and a low voltmeter reading with an alternator that bench-tests perfectly is the classic signature. New battery cables and engine-to-body straps are cheap and take an hour.
- Measure the fan’s real draw with a clamp meter. It settles the sizing question in two minutes: you see the continuous draw, and with min/max recording you catch the inrush spike. That number tells you the fuse rating, the relay rating and whether your charging system has any headroom left. Every forum argument about this is a measurement nobody took.
- Fit an adjustable controller rather than a fixed thermal switch. You choose the switch-on point instead of accepting the manufacturer’s, and a PWM controller ramps the fan up instead of slamming it on — which cuts both the current spike and the noise. Wire the air conditioning trigger too, so the fan runs whenever the compressor is engaged.
- Do not overlook the radiator itself. A fan can only pull air through the core it is given, and an original Fox Body radiator with decades of scale inside it is a cooling problem no fan will solve. If the car already ran warm with the clutch fan, replace the radiator at the same time rather than diagnosing it twice.
- Protect and secure every new wire. Split loom for abrasion, high-temperature sleeve anywhere near the headers, adhesive-lined heat shrink on joints, and a clip every few inches so nothing can sag into a belt or a pulley. A heavy fan feed chafing through to the block is a fire, and it is entirely preventable with an hour of tidy work.
As an Amazon Associate and eBay Partner, toptenpick.com earns from qualifying purchases. Prices and availability are subject to change.